Pages

5.30.2014

Bringing Light to Your Home

Earlier this month I had the amazing opportunity to attend a design event at the Museum of Science in Boston. It was a fantastic evening where I heard Lincoln MKC designer Peter Jones and Zakim Bridge designer Miguel Rosales discuss beauty in design. The event had a gorgeous view of the Zakim as its backdrop. It really was stunning. Equally stunning was the new Lincoln MKC they had on display. This is not your grandfather's Lincoln! The car is really gorgeous - it has a super stylish shape that not-so-subtly hints at speed. I would have loved to take it for a spin. We did get to sit inside for a few minutes and the perforated leather seats (which heat AND cool) were like butter! I was surprised to learn the car has push button shift - what?! - And at night the car lights up as you approach it. Apparently the future is here. I had to pull myself away from the car to attend the actual event!

I learned from the designers that both the automotive and architecture industries are using LED lighting to create high impact with the smallest footprint. Energy savings is crucial these days, and the fact that these lights last longer and tend to look better than tradition lights is also a huge selling point.

The 2015 MKC has a full width LED tail lamp

Philips Color Kinetics LED lighting system illuminates the Leonard P. Zakim Bunker Hill Memorial Bridge
Clearly LED lighting is everywhere these days! And it seems many are making the switch inside their homes as well. With summer right around the corner (I hope!) I've been giving a lot of thought to sprucing up our modest outdoor space. Inspired by this design discussion, I've been exploring environmentally-friendly lighting solutions that will cost less in the long-run, but still fit with my vision of a comfortable outdoor retreat. I recently came across this simple DIY LED tea light project on Apartment Therapy that could be a fun way to bring light and a little personalization to an outdoor space. Not only can you switch up the graphic on the paper wrap, but you could even play with mood lighting by trying different colored lights. This could be the perfect addition to a tablescape at an outdoor dinner party. Perhaps they'd go nicely with this table with built in cooler I've been dying to put together!

4.07.2014

Mix & Match Dining Chairs

I recently picked up a solid wood, Ethan Allen kitchen table off Craigslist - score! It needs a little elbow grease: sanding, staining, painting - but it's the perfect size for our modest kitchen and will provide the additional place settings we desperately need. And for $40, how could I turn it down?! 

As for the seating, that's still to be determined, but I'm totally loving the look of mis-matched, yet cohesive dining chairs. Here are a few styles I've been eyeing.

Love the pops of turquoise here!
Crushing on these aluminum chairs found on Better Homes & Gardens
Mismatched & distressed perfection source

seriously charming! rustic farmhouse mixed with luxe glam (found on Pinterest without a source)
What are your thoughts on mix & match dining chairs? Yay or nay?

11.21.2013

Finding Inspiration

Wow was this a productive weekend! In addition to crossing some errands of my to do list, I ran a 5k and had time to whip up a few new things on my sewing machine. It all started as I was heading from errand to errand. I spotted an adorable antique and vintage store called By the Olde Garden Gate. I recklessly carefully cut across traffic to make the parking lot entrance. I could tell from the decor outside that it was a store I'd love. I was right.


Everything in the store spoke to me. From old typewriters, to vintage cameras, to driftwood wall hangers, to DIY burlap pumpkins, to vintage maps, to wooden shoe forms and decorative keys. I could have spent hours just browsing.


In the end I didn't leave with anything tangible, however I now possessed a TON of design inspiration: old maps in large glass vessels, rolled book pages tied with twine, wooden key hangers, decorating ideas. And a new DIY project. I fell in love with the burlap pumpkins. I only took one photo of a pumpkin fashioned out of an old coffee sack (where do you get these, by the way?!?). And I was on a mission to make my own. I found a blog with great instructions and headed to Michael's to pick up my materials.

After I made the first one, I was on a roll and made 2 more in less than an hour total. I still need to cut wooden stems for two of them, but I'm so happy with how this one came out. I picked up material from Jo Ann's, used some leftover burlap from Michael's for the leaves, and a champagne cork for the stem. I LOVE how it came out!


I couldn't stop after that and ended up making a pink & black buffalo plaid infinity scarf for myself and a matching bandana for Kylie. Here she is modeling the material before I got to work.


10.21.2013

White Kitchens, Subway Tile, Two-Toned Cabinets & Chalkboard Paint

I have noticed a trend in the kitchen photos I've pinned. My board is overwhelmingly white! White cabinets, white back splashes, touches of stainless steel and wood with a mix of modern & farmhouse details & little pops of color.


When we bought our house almost two years ago (cannot believe how fast it's gone by!) we loved the kitchen because it was renovated - a nice change from some of the super outdated kitchens we'd walked through during showings.  Our has granite counters, stainless appliances, tile floors, new cabinets - no hardware, but that should be arriving today! And we still love it, but part of me kinda wishes we could renovate it to look like one of these white kitchens of my dreams. But it doesn't really make sense to take on that project at this stage. It's a beautiful kitchen and making any changes to it won't add any value to the house when we're ready to sell.


But a girl can still dream a little, right? So while I wait for that project to make sense, here are some of the designs I'm completely drawn to. My dream kitchen is a combination of all of these.

I love the bright, cleanliness of this kitchen. The countertops are awesome, white with little hints of gray, and the white subway tile backsplash.

Traditional Kitchen by South San Francisco General Contractors Dijeau Poage Construction

I really like how they chose a different color base for the island in this photo. I personally love a rich navy blue tone.

Originally spotted here

Or you could go two tone with white uppers and navy lowers, like this couple, featured in Apartment Therapy, did. This is one of my all-time favorite designs.

Found here

A butcher block island might be nice? I also like the glass front cabinets. Perfect for displaying beautiful decorative items.

Traditional Kitchen by Toronto Design-Build Firms Capoferro Design Build Group

This is a beautiful kitchen (and a drool-worthy home, if you have time for a tour)

Check out more pics

I'm still not over chalkboard walls. I think they're perfect for kitchens - grocery lists, weekly menus, etc. I have been debating one for a while in my kitchen, just haven't mustered up the courage yet. I think they look particularly great in white kitchens like this one.

Before & After on Design Sponge
This kitchen is so bright and air, thanks to the huge window above the sink. I like the cabinetry, clean simple lines, and the glass cabinets with grids. I also love the cup pulls. But my favorite thing in this kitchen are the wood and metal stools!


The next two kitchens are probably some of my favorites (and they're very similar). The first has the beautiful white cabinets and countertops, glass cabinets and open shelving, cup pulls, hardwood floors (I'm sick of the tile) and an island in a darker shade. 

Originally found here
And this one incorporates a lot of the same elements, but with the darker lower cabinets instead of an island. I'm loving those drawer pulls as well. How cute is that wood and metal shelf, would go great with those industrial stools. The lantern above the sink also caught my eye.


So what do you think? Do you like white kitchens, two-tone cabinets, subway tile? Thoughts on the chalkboard paint? Still in or should I give up on the idea?

10.17.2013

Vintage Kodak Camera


Scored this awesome vintage, 1950's Kodak Duaflex II camera yesterday while browsing a local antique shop. I was in search of some fun decorative accents to add to my home decor. I've totally slacked on the decorating (and blogging) lately. I only recently began the switch-over from sand and seashells to pumpkins and apple- and spice-scented candles, I know, I know I'm more than a little behind.

I've started classes toward my MBA, have been working A LOT and recently took on a freelance copywriting job...plus I've been away from home 4 of the last 6 weekends. So I've been a little tied up with other things. However, I'm getting back to my passion for decorating ASAP.

I even have a handful of projects in progress, so stay tuned...


11.30.2012

Someone's All Grown Up

I'm SO excited to share one of the latest transformations (in progress) at The Green Bungalow. Our bedroom! Finally after concentrating on many other areas of the house - hopefully I'll get to share those soon! - the "master" has finally grown up. Remember about a year ago when it looked like this? *cringe!


A couple fresh coats of gray paint, new lamp, new comforter and a position-switch from Kylie and it became this (still cringe-worthy):


After several trips to west elm (bedding, throw), even more to HomeGoods (lamps, pillows, large votives, rug, and gold & mirrored nightstand) and some online shopping (bed), I'm psyched to reveal the brand new look:


You'll notice Kylie can no longer climb up - I have mixed feelings about this.

It's still a work progress. I'm trying to find a similar nightstand for J's side and we need to do something with the blank wall, but it's definitely a vast improvement!

We'd been in beyond-desperate need of a new mattress. The Full we'd been sleeping on since college felt like an ongoing joke, so we sprung for a Queen. And, there was no way I was going without a real bed after sleeping on a wooden futon frame for the last 10+ years. So I did some research and found the beauty above. Thanks to a lengthy review I found on Nesting Place (she has the most gorgeous home, so def check our her blog), I felt confident ordering my upholstered nailhead bed online. I ordered from Wayfair and got 10% off plus free shipping, which made the bed cheaper than Amazon, believe it or not! Wayfair reviewers gave the bed much higher ratings than Amazon, which was a little more comforting. And, much to my delight, the nailhead trim is ALL real! See:


I'm not sure if there's a quality difference between Wayfair and Amazon because the bed's from the same manufacturer, or if they just made some changes, but the bed is much nicer than the Amazon reviews make it out to be. And it was real easy to put together.

I went back and forth on the color scheme. It's neutral enough that I had a lot of options, but none felt just right. So given the gray, the mercury glass table lamps and the sparkly gold throw I usually keep in the guest room, I decided to go for a mixed metals look. Perfect timing with all the holiday options at the stores right now! I think it totally works.


And I scored this beauty on clearance at HomeGoods...I actually left it on my first visit and woke up wishing I'd bought it (is that sick or what?!). Luckily it was there when I went back the next day (excuse the dust)! A few gold and silver votives round it out.


I'm super pleased with the way the room is shaping up. The rest of our plans include custom-made-by-my-grandmother curtains in a shimmery gold. I stumbled on these awesome holiday tablecloths at HomeGoods, so I'm enlist help to turn them into curtains. We're also on the lookout for a small chandelier and I need to decide what to do with the wall behind the bed. I have some silver mirrors, but haven't figured out if I want to use those over the nightstands or opt for something roundish, centered over the headboard to mix up all the straight lines. Still TBD, but in the meantime I am thoroughly enjoying my grown up room!

6.28.2012

Scrap Paper Pinwheels

Who knew how easy pinwheels were to make? These literally took me under 10 minutes. They're really fun and add a pop of color to any space - perfect for our family room, which was dominated by gray and white at the time I made these (we've since added lots of turquoise!). I think they look cute in the vase, and I cannot kill the pinwheels as I tend to do with flowers, so that's a bonus!


I found a great tutorial from kiki creates, so I decided to give them a whirl.

I didn't follow the template exactly because I don't have a printer at home, but they still came out fine. This is how I did it:
  • Start by cutting 2 scrapbook papers to 6" x 6" squares.
  • Glue the papers together with rubber cement (I didn't have spray adhesive) - coat each page with the rubber cement and let it dry, then carefully paste the pages together so they're even. Letting the rubber cement dry first, allows for a more secure bond, but you do need to be careful lining everything up. 
  • I then used kiki's template to guide me where to cut the lines and punch the holes.
  • I used my ruler and lined up diagonally from point to point, leaving about 1-1/2" in the middle.
  • For the holes, I didn't really measure, just used her guide to eyeball it, marked the 4 spots.
  • Then take each point and line up your holes with the center hole, folding toward the front and going clockwise.
  • Once you have everything lined up, secure the pinwheels with a brad. I used a very plain brad, but depending on your paper, you could use something more fancy, perhaps a sparkly rhinestone brad?
  • The brads are secured on the back to floral wire for the stands.
I made the pinwheel on the right a little bit larger and used double sided scrap booking paper, so I didn't need my rubber cement. I stopped at two, but am thinking about adding a third one b/c I don't like symmetry and think the vase would look nice with one more. 


These pinwheels made from maps are pretty awesome too! Since I love to travel, I might make some of these to put in what will be my travel-themed office.


What easy 10 minute project have you whipped up lately?

6.26.2012

Orange Nectarine Raspberry Smoothie

I made a pretty awesome smoothie on Saturday afternoon for the hubs and I. It was really refreshing on the scorching day we were having. However, although it does have a bunch of fruit in it, it's very high in sugar, so it's not the healthiest drink, but still not the worst. It hit the spot and I'd still recommend giving it a try (just not every day!)


I used the awesome magic bullet my sister gave us to make this one. I didn't measure anything, so just eyeball it and add more of whichever ingredient is your fave - it's really good with a little extra sorbet!


  • Get your blender or magic bullet
  • Add a little orange juice 
  • Cut up a ripe nectarine and toss it in
  • Add a few spoonfuls of raspberry sorbet
  • Blend to break up the chunks of nectarine
  • Then add ice, blend some more and you're good to go


It's seriously so good (and I HATE orange juice). Super refreshing. I also think it would be an awesome cocktail if you just add a few splashes of raspberry flavored vodka.


Do you have any delicious, refreshing smoothie recipes to share?

6.22.2012

Bar Carts & Booze Displays


Following the happy hour theme from yesterday, I thought I’d unveil my new mini bar. In our old apartment we had a fabulous built in with huge glass cabinets. That’s where I kept all of our adult beverages and barware. The Green Bungalow doesn’t have a dining room, or a space that’s conducive for this type of storage, so I created my own...iPhone photo alert!


I contemplated a beverage cart, but in looking at my surroundings, I decided there wasn’t really a perfect place for it. That’s when it hit me – my mirrored HomeGoods cabinet!! (which hasn’t been filled since I bought it). I relocated a framed photograph, a candle and a vase of pinwheels I’d made (more on those later) and headed to the basement to collect some booze, mixers, wine stoppers and coasters to take up the space. I think it looks pretty great, if I do say so myself! I was also able to fit my wine glasses inside the cabinet – perfection!

But, one of my favorite parts of the bar is the “Cheers” chalkboard, inviting friends for a drink. That was super easy to make using an ornate frame I picked up at HomeGoods (where else?!) and some chalkboard paint. If you take the glass out of the frame, you can apply the chalk paint right over it. The worst part is waiting 24 hours for it to be ready. Once it was, I attempted writing “Cheers” a few times before it actually came out how I liked it. Now that it’s hung and all put together, I’m glad I didn’t splurge on a bar cart!

Working with what you’ve got is so great because it gives a fresh look to your space and even better, it’s free! Plus it’s just fun pulling together a few items you have laying around and creating something new with them.

What items have you been inspired by around your house? Anyone else have all their booze out on display? What does yours look like? I will try to take better photos with my Nikon this weekend!

6.21.2012

Happy Hour Wreath


Totally been slacking on the blog lately! I have actually completed some fun projects, but haven’t found the time to photograph them in natural light, with a good camera, and write about them. Between changing jobs, helping my husband start up his dog walking business, “Paws on the Pavement” and getting back into a workout regimen, I’ve been keeping my schedule pretty packed.

But here’s a quick look at one finished project that I put together in under 5 minutes – my “Happy Hour” wreath. Super simple and bright and colorful just in time for summer.


I picked up the grapevine wreath from Michael’s on a member special and I had a package of drink umbrellas laying around that I never used – for some odd reason I couldn’t find an occasion to use them?! Ha!

All I did was arrange them in a layout I liked, trying to alternate colors, and stuck the sticks through the vines. So simple. Hang on the front door and you’ll be the party house on the block! The only thing I would recommend, which I didn’t do myself, is securing the umbrellas in some way, either with wire or glue, etc. I noticed that the blue umbrellas keep falling out, but I also look at it as an opportunity to reuse the bare wreath in the fall.

Feel free to use my wreath as a guide for your own and share your photos below!

In 5 minutes when you’re done with your wreath, head over and check out my husband’s new blog (if you love dogs, or just want to see some completely adorable pics of Kylie!) It’s still a work in progress, but we’re getting there! www.pawsonthepavement.blogspot.com.

What fun summer projects have you been working on?

4.30.2012

Fab Freebie!

Despite my husband's complaints that I take forever quite a bit of time to finish my projects, and that I have a ton of stuff taking over his garage, I know he appreciates my crafty side. Here's the proof...


I got a text from him saying this nightstand was on the side of the road. The text was from an hour ago, so I raced home after Zumba hoping it was still sitting on the curb. To my delight it was...and best of all...it was free! Free! Can you believe it? It's Thomasville brand, in great shape, solid wood, it just needs a little sanding, paint, new pulls/knobs. I wish there had been two so we could use them in our bedroom, but one free nightstand is better than no free nightstands. Now I need to decide where I want to keep it. I am dying to paint a piece of furniture bright red, but unless I use it in my office, red doesn't go with my color scheme in our master or spare bedrooms.

Stay tuned for the update...it may take a while ;-)

I did start another project this weekend that's been on my list for a while...will give you the details soon!

Anyone have any fabulous furniture finds this weekend? Don't you just love free stuff??


~Amy

4.06.2012

What I Pinned: Pinterest March 2012

I'm a little behind on this, but these are my March faves from Pinterest...follow my boards to see more!


Coffee Table: I pretty much love everything about this room, but I pinned it especially for the coffee table. I love the industrial look with the metal frame, the casters and the farmhouse appeal of the wood. I'm trying to figure out how I can make this myself.


Natural Dyes for Easter Eggs: Perfect to try this weekend. I don't think Jon & I will be dying Easter eggs this year, but good to have for reference.


Red Bench from World Market: I'm really digging this bench, also available in a few other colors. It's pretty inexpensive as well, but I've never purchased anything from World Market before, so I'm not sure about the quality, but I think it would look super cute on our front porch.


Jalapeno Cilantro Margarita Recipe: Ohmygod this sounds delicious! A spicy jalapeno mingled with refreshing cilantro and lime - it's the perfect summer cocktail. I hope to be enjoying many of these on the patio this summer!


Luggage Shelves: I already wrote a post on these because I'm so in LOVE with them. I really really really NEED to do this in my office. If anyone has any vintage luggage they'd like to donate to the project, please let me know!! Such an amazing idea!


Stools, Table, Chevron Print: Ignore that this table has Christmas decorations on it. Now can we talk about how adorable those little stools are?! I freakin love them. And I love the chevron print in the backround that I originally thought was paint or wallpaper, but just realized it's art - genius! I love the colors, the cross between the glossy white table, the modern chevron print and the vintage stools that look like they were made from crates, and the mix of metal & wood. I want this in my house!


Buffalo Chicken Egg Rolls: Just say buffalo and chicken in the same sentence and my mouth waters. These little egg rolls look amazingly delicious and easy to make...bonus that they boast to be only 100 calories each!


White & Green Kitchen: I want to make something in this kitchen, perhaps the buffalo chicken spring rolls and a jalapeno cilantro margarita? (smile) It's just so bright and welcoming and the pop of green against the white & gray color scheme really makes the island the focal point of the room. I want an island, sigh.


50+ Wood Pallet Project Ideas: So many great ideas for transforming wood pallets into functional pieces for your home. I have been dying to do something with pallets and there are tons of options on this site.


And for dessert....


Pretzel Crusted, Reese's Peanut Butter Cup Cookie Pie: Wow! I actually made this a few weeks ago to bring to a friend's for dessert. It was incredible. Seriously rich, so you can't eat too much, but it was amazing. If you like cookies, chocolate and peanut butter, and who doesn't, then you need to try this dessert. It was really quick and easy to make too - definitely my kind of recipe.

What have you been pinning? Leave your pinterest link below so I can check out your pins and follow you too!

3.28.2012

DIY Wine Crate Baskets


Ever since my bridal shower almost two years ago, I've been dying to transform the wine crates used in the table centerpieces into something functional for the house. I considered turning them into shelving, but there isn't anywhere in the bungalow I'd like to keep them, so I decided to use them as storage baskets instead.

I headed to Home Depot to pick up some thick rope to use for the handles and waited for a warm, sunny day when I could head out and stain them. In the meantime, I sanded them down and made use of my brand new sander - so fun!

This is what the wine crates looked like before:


When the sunny day finally came, I grabbed some stain at my local hardware store. I decided on Minwax Wood Finish in Special Walnut because I wanted a dark brown stain without much red in it. Plus I liked that it was "special" walnut!


I started by staining the bottom first in case I didn't end up liking the color (I used a cheap ikea paint brush, probably not the right utensil, but it worked). Then I stained the 4 sides and finally the inside. Jon helped a little bit. He likes to jump on and help with my projects after I've started them.


I waited 5-15 mins and then wiped the sides down, just as the directions said. Admittedly I did not read the directions right away, so the stain did sit for a little longer in some spots, but I made sure to scrub it down with a rag to get any sticky excess stain off.

It was a gorgeous day when I did the staining so I left the crates in the sun to dry for a few hours. Then I grabbed Jon and had him drill the holes for the rope handles. The rope was 3/8" thick and so was the drill bit we used.


To get the measurements for the drill holes I just eyeballed it first to decide the best position. I didn't want them exactly centered from top to bottom, just a smidge higher than the middle. So we measured 3" down from the top and 4" from each side, then consulted the level just to be sure before drilling.

Putting the rope in was little snug, but it worked. I made knots on the insides of the crates so the handles would stay.

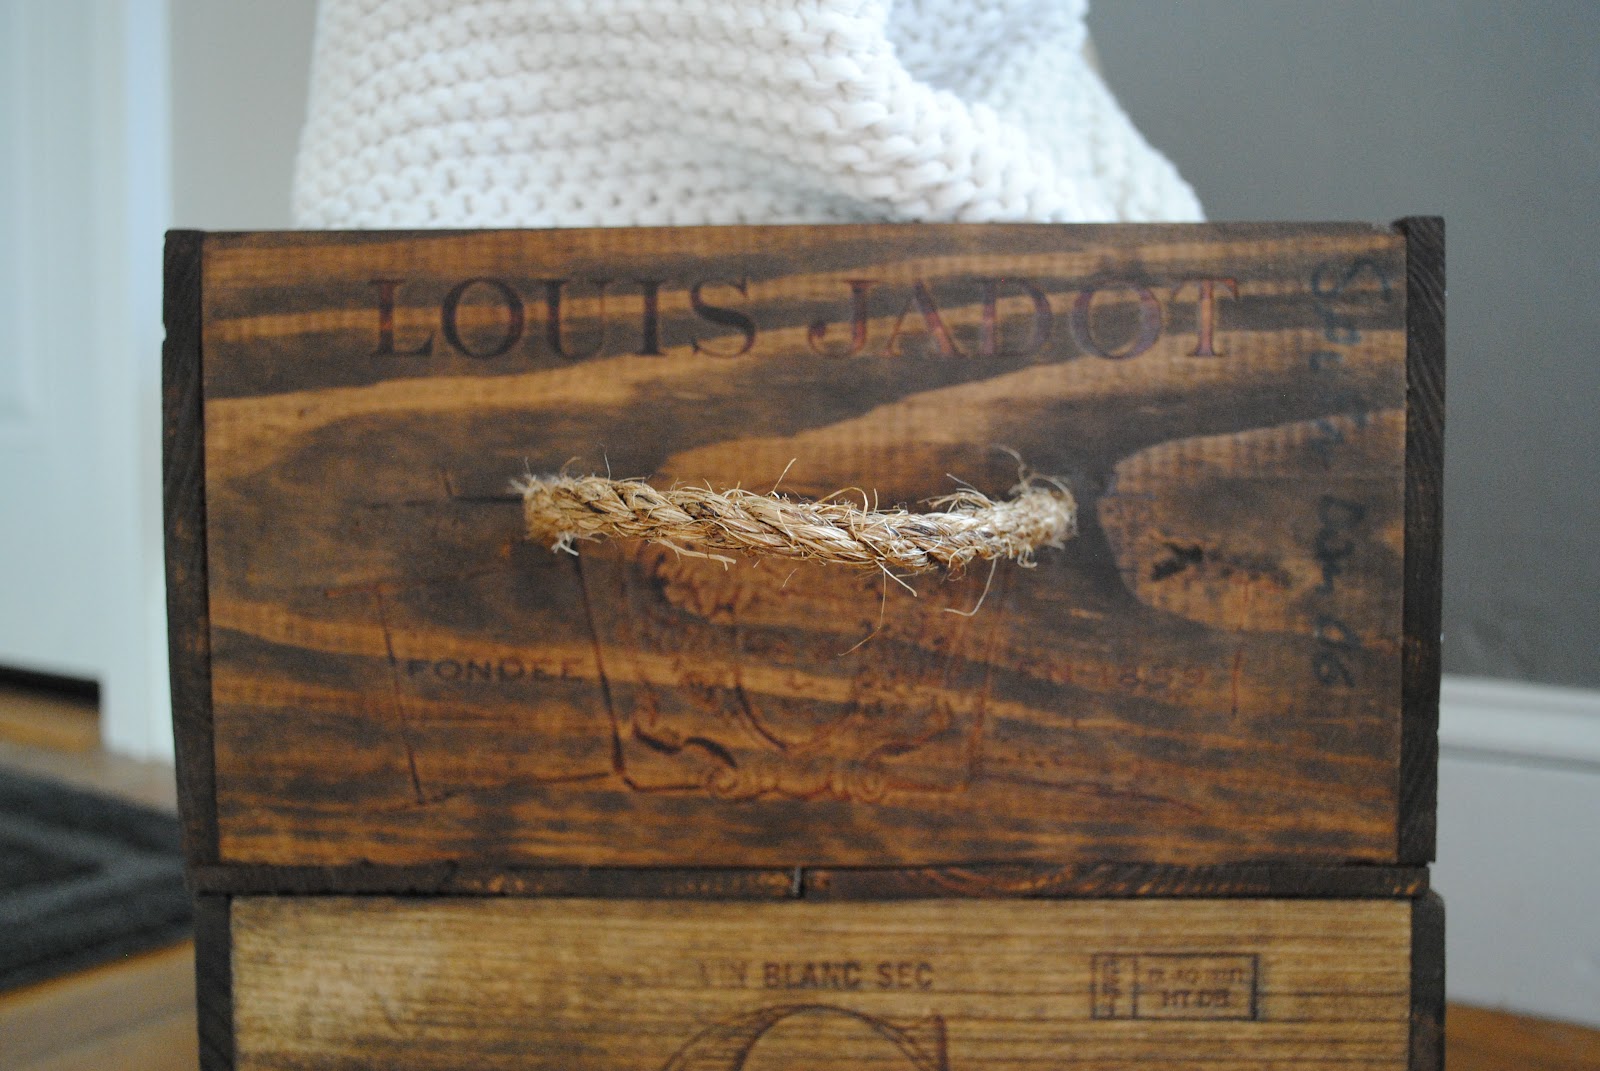
Here are some more photos of the finished crates. I LOVE how they turned out!


My attempt at being artistic in my photography...


Close up of the rope handles...


The wood was a little different between the two crates, which I think adds some interest to both pieces...


And finally, on display in our family room...


What do you think? Have you transformed your own set of wine crates? How did you do it?

~Amy