Pages

6.26.2012

Orange Nectarine Raspberry Smoothie

I made a pretty awesome smoothie on Saturday afternoon for the hubs and I. It was really refreshing on the scorching day we were having. However, although it does have a bunch of fruit in it, it's very high in sugar, so it's not the healthiest drink, but still not the worst. It hit the spot and I'd still recommend giving it a try (just not every day!)


I used the awesome magic bullet my sister gave us to make this one. I didn't measure anything, so just eyeball it and add more of whichever ingredient is your fave - it's really good with a little extra sorbet!


  • Get your blender or magic bullet
  • Add a little orange juice 
  • Cut up a ripe nectarine and toss it in
  • Add a few spoonfuls of raspberry sorbet
  • Blend to break up the chunks of nectarine
  • Then add ice, blend some more and you're good to go


It's seriously so good (and I HATE orange juice). Super refreshing. I also think it would be an awesome cocktail if you just add a few splashes of raspberry flavored vodka.


Do you have any delicious, refreshing smoothie recipes to share?

6.22.2012

Bar Carts & Booze Displays


Following the happy hour theme from yesterday, I thought I’d unveil my new mini bar. In our old apartment we had a fabulous built in with huge glass cabinets. That’s where I kept all of our adult beverages and barware. The Green Bungalow doesn’t have a dining room, or a space that’s conducive for this type of storage, so I created my own...iPhone photo alert!


I contemplated a beverage cart, but in looking at my surroundings, I decided there wasn’t really a perfect place for it. That’s when it hit me – my mirrored HomeGoods cabinet!! (which hasn’t been filled since I bought it). I relocated a framed photograph, a candle and a vase of pinwheels I’d made (more on those later) and headed to the basement to collect some booze, mixers, wine stoppers and coasters to take up the space. I think it looks pretty great, if I do say so myself! I was also able to fit my wine glasses inside the cabinet – perfection!

But, one of my favorite parts of the bar is the “Cheers” chalkboard, inviting friends for a drink. That was super easy to make using an ornate frame I picked up at HomeGoods (where else?!) and some chalkboard paint. If you take the glass out of the frame, you can apply the chalk paint right over it. The worst part is waiting 24 hours for it to be ready. Once it was, I attempted writing “Cheers” a few times before it actually came out how I liked it. Now that it’s hung and all put together, I’m glad I didn’t splurge on a bar cart!

Working with what you’ve got is so great because it gives a fresh look to your space and even better, it’s free! Plus it’s just fun pulling together a few items you have laying around and creating something new with them.

What items have you been inspired by around your house? Anyone else have all their booze out on display? What does yours look like? I will try to take better photos with my Nikon this weekend!

6.21.2012

Happy Hour Wreath


Totally been slacking on the blog lately! I have actually completed some fun projects, but haven’t found the time to photograph them in natural light, with a good camera, and write about them. Between changing jobs, helping my husband start up his dog walking business, “Paws on the Pavement” and getting back into a workout regimen, I’ve been keeping my schedule pretty packed.

But here’s a quick look at one finished project that I put together in under 5 minutes – my “Happy Hour” wreath. Super simple and bright and colorful just in time for summer.


I picked up the grapevine wreath from Michael’s on a member special and I had a package of drink umbrellas laying around that I never used – for some odd reason I couldn’t find an occasion to use them?! Ha!

All I did was arrange them in a layout I liked, trying to alternate colors, and stuck the sticks through the vines. So simple. Hang on the front door and you’ll be the party house on the block! The only thing I would recommend, which I didn’t do myself, is securing the umbrellas in some way, either with wire or glue, etc. I noticed that the blue umbrellas keep falling out, but I also look at it as an opportunity to reuse the bare wreath in the fall.

Feel free to use my wreath as a guide for your own and share your photos below!

In 5 minutes when you’re done with your wreath, head over and check out my husband’s new blog (if you love dogs, or just want to see some completely adorable pics of Kylie!) It’s still a work in progress, but we’re getting there! www.pawsonthepavement.blogspot.com.

What fun summer projects have you been working on?

4.30.2012

Fab Freebie!

Despite my husband's complaints that I take forever quite a bit of time to finish my projects, and that I have a ton of stuff taking over his garage, I know he appreciates my crafty side. Here's the proof...


I got a text from him saying this nightstand was on the side of the road. The text was from an hour ago, so I raced home after Zumba hoping it was still sitting on the curb. To my delight it was...and best of all...it was free! Free! Can you believe it? It's Thomasville brand, in great shape, solid wood, it just needs a little sanding, paint, new pulls/knobs. I wish there had been two so we could use them in our bedroom, but one free nightstand is better than no free nightstands. Now I need to decide where I want to keep it. I am dying to paint a piece of furniture bright red, but unless I use it in my office, red doesn't go with my color scheme in our master or spare bedrooms.

Stay tuned for the update...it may take a while ;-)

I did start another project this weekend that's been on my list for a while...will give you the details soon!

Anyone have any fabulous furniture finds this weekend? Don't you just love free stuff??


~Amy

4.06.2012

What I Pinned: Pinterest March 2012

I'm a little behind on this, but these are my March faves from Pinterest...follow my boards to see more!


Coffee Table: I pretty much love everything about this room, but I pinned it especially for the coffee table. I love the industrial look with the metal frame, the casters and the farmhouse appeal of the wood. I'm trying to figure out how I can make this myself.


Natural Dyes for Easter Eggs: Perfect to try this weekend. I don't think Jon & I will be dying Easter eggs this year, but good to have for reference.


Red Bench from World Market: I'm really digging this bench, also available in a few other colors. It's pretty inexpensive as well, but I've never purchased anything from World Market before, so I'm not sure about the quality, but I think it would look super cute on our front porch.


Jalapeno Cilantro Margarita Recipe: Ohmygod this sounds delicious! A spicy jalapeno mingled with refreshing cilantro and lime - it's the perfect summer cocktail. I hope to be enjoying many of these on the patio this summer!


Luggage Shelves: I already wrote a post on these because I'm so in LOVE with them. I really really really NEED to do this in my office. If anyone has any vintage luggage they'd like to donate to the project, please let me know!! Such an amazing idea!


Stools, Table, Chevron Print: Ignore that this table has Christmas decorations on it. Now can we talk about how adorable those little stools are?! I freakin love them. And I love the chevron print in the backround that I originally thought was paint or wallpaper, but just realized it's art - genius! I love the colors, the cross between the glossy white table, the modern chevron print and the vintage stools that look like they were made from crates, and the mix of metal & wood. I want this in my house!


Buffalo Chicken Egg Rolls: Just say buffalo and chicken in the same sentence and my mouth waters. These little egg rolls look amazingly delicious and easy to make...bonus that they boast to be only 100 calories each!


White & Green Kitchen: I want to make something in this kitchen, perhaps the buffalo chicken spring rolls and a jalapeno cilantro margarita? (smile) It's just so bright and welcoming and the pop of green against the white & gray color scheme really makes the island the focal point of the room. I want an island, sigh.


50+ Wood Pallet Project Ideas: So many great ideas for transforming wood pallets into functional pieces for your home. I have been dying to do something with pallets and there are tons of options on this site.


And for dessert....


Pretzel Crusted, Reese's Peanut Butter Cup Cookie Pie: Wow! I actually made this a few weeks ago to bring to a friend's for dessert. It was incredible. Seriously rich, so you can't eat too much, but it was amazing. If you like cookies, chocolate and peanut butter, and who doesn't, then you need to try this dessert. It was really quick and easy to make too - definitely my kind of recipe.

What have you been pinning? Leave your pinterest link below so I can check out your pins and follow you too!

3.28.2012

DIY Wine Crate Baskets


Ever since my bridal shower almost two years ago, I've been dying to transform the wine crates used in the table centerpieces into something functional for the house. I considered turning them into shelving, but there isn't anywhere in the bungalow I'd like to keep them, so I decided to use them as storage baskets instead.

I headed to Home Depot to pick up some thick rope to use for the handles and waited for a warm, sunny day when I could head out and stain them. In the meantime, I sanded them down and made use of my brand new sander - so fun!

This is what the wine crates looked like before:


When the sunny day finally came, I grabbed some stain at my local hardware store. I decided on Minwax Wood Finish in Special Walnut because I wanted a dark brown stain without much red in it. Plus I liked that it was "special" walnut!


I started by staining the bottom first in case I didn't end up liking the color (I used a cheap ikea paint brush, probably not the right utensil, but it worked). Then I stained the 4 sides and finally the inside. Jon helped a little bit. He likes to jump on and help with my projects after I've started them.


I waited 5-15 mins and then wiped the sides down, just as the directions said. Admittedly I did not read the directions right away, so the stain did sit for a little longer in some spots, but I made sure to scrub it down with a rag to get any sticky excess stain off.

It was a gorgeous day when I did the staining so I left the crates in the sun to dry for a few hours. Then I grabbed Jon and had him drill the holes for the rope handles. The rope was 3/8" thick and so was the drill bit we used.


To get the measurements for the drill holes I just eyeballed it first to decide the best position. I didn't want them exactly centered from top to bottom, just a smidge higher than the middle. So we measured 3" down from the top and 4" from each side, then consulted the level just to be sure before drilling.

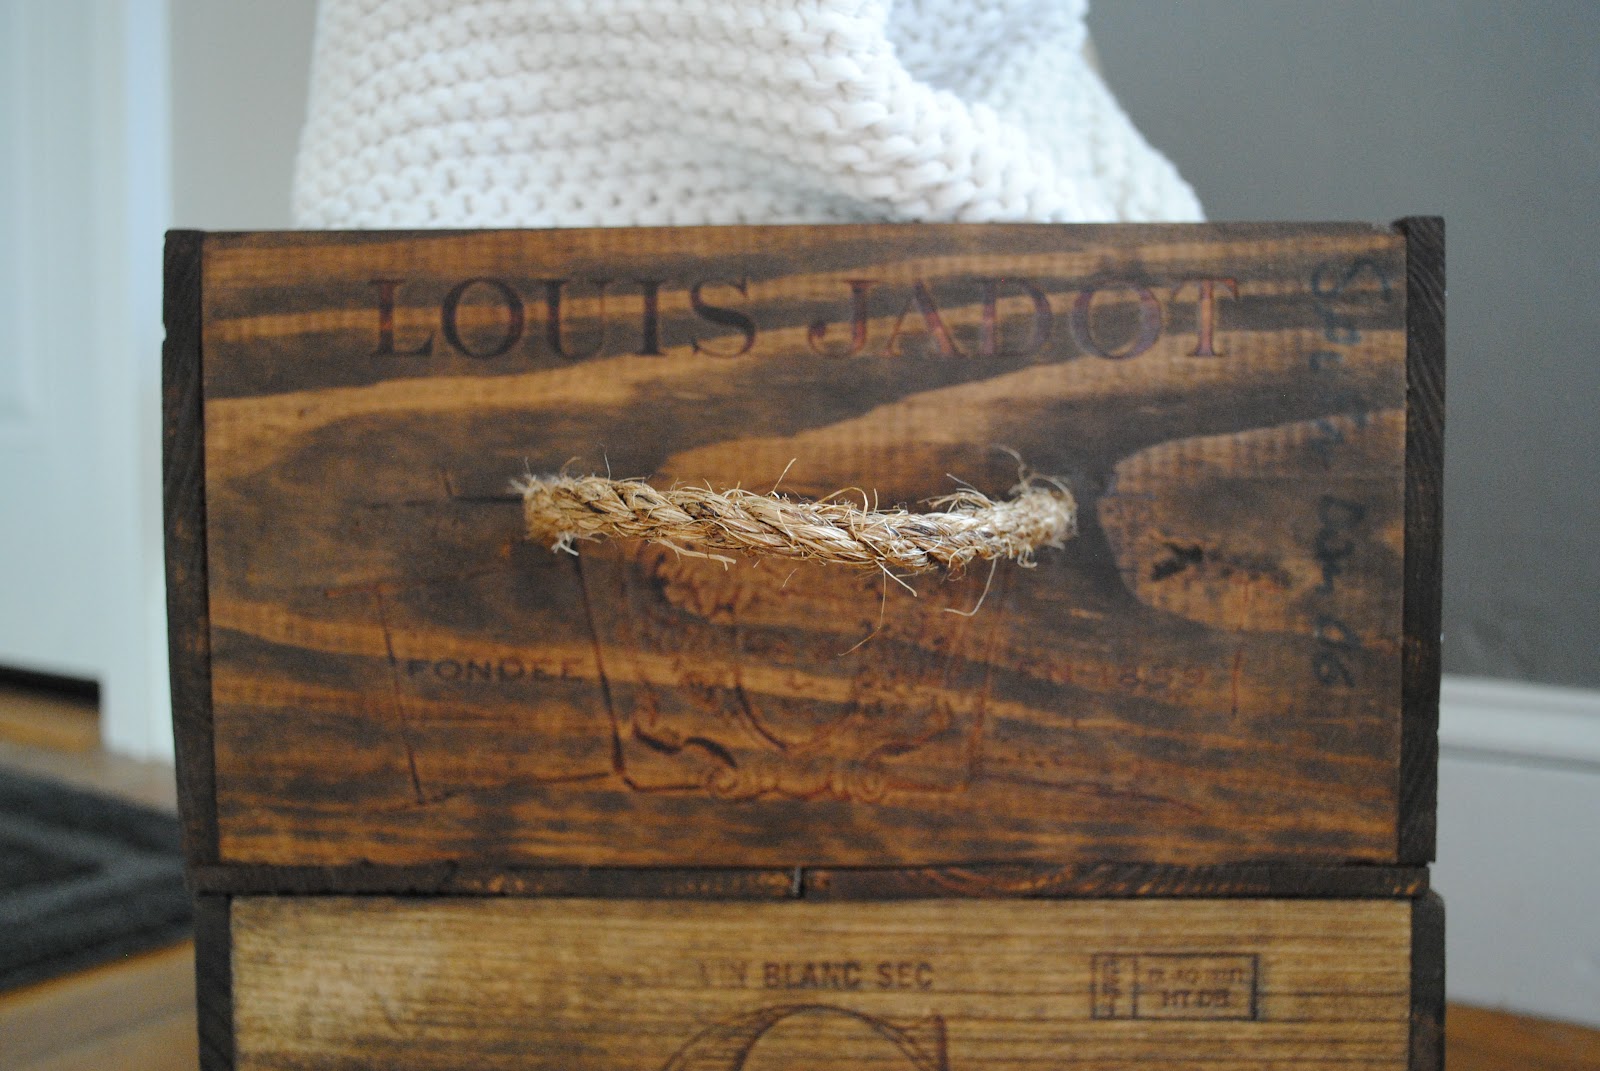
Putting the rope in was little snug, but it worked. I made knots on the insides of the crates so the handles would stay.

Here are some more photos of the finished crates. I LOVE how they turned out!


My attempt at being artistic in my photography...


Close up of the rope handles...


The wood was a little different between the two crates, which I think adds some interest to both pieces...


And finally, on display in our family room...


What do you think? Have you transformed your own set of wine crates? How did you do it?

~Amy

3.27.2012

MarieBelle Frangelico Truffles & Guinness

Raise your hand if you love chocolate...ok, it's hard to write a blog post with one hand! My friends came to visit The Green Bungalow over St. Patty's weekend and they brought me a delicious housewarming gift: MarieBelle Frangelico Truffles! I hadn't heard of them, but was eager to rip open the adorable red & blue box.


I am a HUGE fan of truffles. I also happen to LOVE hazelnut chocolate. So when my friend presented me with this cute little box of four truffles I was excited to try them. I have to admit though, I kinda didn't want to unwrap them; the packaging was too cute! And it didn't end there, look at this colorful pattern painted on top!


But when my friend said, "let's try them with a Guinness." I gave her a look. Guinness? Beer and chocolate? That was not my idea of a good pairing. I've heard of chocolate and wine pairings and have been to a tasting that did just this, but have never thought about pairing chocolate and beer. Then again, it was St. Patrick's Day. I'll try pretty much anything, and I never say no to alcohol, so I wasn't against giving it a shot.


It was a surprisingly yummy combination! The Frangelico Truffles have a thin crisp chocolate shell and a delicious, smooth, nutty interior. The Guinness really complimented the truffles too. Neither one overpowered the other. The taste was clean and refreshing. What I really like about these truffles too is that they aren't real heavy. Some chocolate just weighs you down...good excuse to eat more than one! ;-)

I've been slowly enjoying the extra box that was left behind. The truffles would make a fabulous gift for any occasion. They also come with a recipe for a Frangelico Truffle cocktail. I might pick up a bottle and give one a shake this weekend. You can pick up a gift box at MarieBelle in Soho, NY, or online. Don't forget to grab a box for yourself!

~Amy