Pages

11.30.2012

Someone's All Grown Up

I'm SO excited to share one of the latest transformations (in progress) at The Green Bungalow. Our bedroom! Finally after concentrating on many other areas of the house - hopefully I'll get to share those soon! - the "master" has finally grown up. Remember about a year ago when it looked like this? *cringe!


A couple fresh coats of gray paint, new lamp, new comforter and a position-switch from Kylie and it became this (still cringe-worthy):


After several trips to west elm (bedding, throw), even more to HomeGoods (lamps, pillows, large votives, rug, and gold & mirrored nightstand) and some online shopping (bed), I'm psyched to reveal the brand new look:


You'll notice Kylie can no longer climb up - I have mixed feelings about this.

It's still a work progress. I'm trying to find a similar nightstand for J's side and we need to do something with the blank wall, but it's definitely a vast improvement!

We'd been in beyond-desperate need of a new mattress. The Full we'd been sleeping on since college felt like an ongoing joke, so we sprung for a Queen. And, there was no way I was going without a real bed after sleeping on a wooden futon frame for the last 10+ years. So I did some research and found the beauty above. Thanks to a lengthy review I found on Nesting Place (she has the most gorgeous home, so def check our her blog), I felt confident ordering my upholstered nailhead bed online. I ordered from Wayfair and got 10% off plus free shipping, which made the bed cheaper than Amazon, believe it or not! Wayfair reviewers gave the bed much higher ratings than Amazon, which was a little more comforting. And, much to my delight, the nailhead trim is ALL real! See:


I'm not sure if there's a quality difference between Wayfair and Amazon because the bed's from the same manufacturer, or if they just made some changes, but the bed is much nicer than the Amazon reviews make it out to be. And it was real easy to put together.

I went back and forth on the color scheme. It's neutral enough that I had a lot of options, but none felt just right. So given the gray, the mercury glass table lamps and the sparkly gold throw I usually keep in the guest room, I decided to go for a mixed metals look. Perfect timing with all the holiday options at the stores right now! I think it totally works.


And I scored this beauty on clearance at HomeGoods...I actually left it on my first visit and woke up wishing I'd bought it (is that sick or what?!). Luckily it was there when I went back the next day (excuse the dust)! A few gold and silver votives round it out.


I'm super pleased with the way the room is shaping up. The rest of our plans include custom-made-by-my-grandmother curtains in a shimmery gold. I stumbled on these awesome holiday tablecloths at HomeGoods, so I'm enlist help to turn them into curtains. We're also on the lookout for a small chandelier and I need to decide what to do with the wall behind the bed. I have some silver mirrors, but haven't figured out if I want to use those over the nightstands or opt for something roundish, centered over the headboard to mix up all the straight lines. Still TBD, but in the meantime I am thoroughly enjoying my grown up room!

6.28.2012

Scrap Paper Pinwheels

Who knew how easy pinwheels were to make? These literally took me under 10 minutes. They're really fun and add a pop of color to any space - perfect for our family room, which was dominated by gray and white at the time I made these (we've since added lots of turquoise!). I think they look cute in the vase, and I cannot kill the pinwheels as I tend to do with flowers, so that's a bonus!


I found a great tutorial from kiki creates, so I decided to give them a whirl.

I didn't follow the template exactly because I don't have a printer at home, but they still came out fine. This is how I did it:
  • Start by cutting 2 scrapbook papers to 6" x 6" squares.
  • Glue the papers together with rubber cement (I didn't have spray adhesive) - coat each page with the rubber cement and let it dry, then carefully paste the pages together so they're even. Letting the rubber cement dry first, allows for a more secure bond, but you do need to be careful lining everything up. 
  • I then used kiki's template to guide me where to cut the lines and punch the holes.
  • I used my ruler and lined up diagonally from point to point, leaving about 1-1/2" in the middle.
  • For the holes, I didn't really measure, just used her guide to eyeball it, marked the 4 spots.
  • Then take each point and line up your holes with the center hole, folding toward the front and going clockwise.
  • Once you have everything lined up, secure the pinwheels with a brad. I used a very plain brad, but depending on your paper, you could use something more fancy, perhaps a sparkly rhinestone brad?
  • The brads are secured on the back to floral wire for the stands.
I made the pinwheel on the right a little bit larger and used double sided scrap booking paper, so I didn't need my rubber cement. I stopped at two, but am thinking about adding a third one b/c I don't like symmetry and think the vase would look nice with one more. 


These pinwheels made from maps are pretty awesome too! Since I love to travel, I might make some of these to put in what will be my travel-themed office.


What easy 10 minute project have you whipped up lately?

6.26.2012

Orange Nectarine Raspberry Smoothie

I made a pretty awesome smoothie on Saturday afternoon for the hubs and I. It was really refreshing on the scorching day we were having. However, although it does have a bunch of fruit in it, it's very high in sugar, so it's not the healthiest drink, but still not the worst. It hit the spot and I'd still recommend giving it a try (just not every day!)


I used the awesome magic bullet my sister gave us to make this one. I didn't measure anything, so just eyeball it and add more of whichever ingredient is your fave - it's really good with a little extra sorbet!


  • Get your blender or magic bullet
  • Add a little orange juice 
  • Cut up a ripe nectarine and toss it in
  • Add a few spoonfuls of raspberry sorbet
  • Blend to break up the chunks of nectarine
  • Then add ice, blend some more and you're good to go


It's seriously so good (and I HATE orange juice). Super refreshing. I also think it would be an awesome cocktail if you just add a few splashes of raspberry flavored vodka.


Do you have any delicious, refreshing smoothie recipes to share?

6.22.2012

Bar Carts & Booze Displays


Following the happy hour theme from yesterday, I thought I’d unveil my new mini bar. In our old apartment we had a fabulous built in with huge glass cabinets. That’s where I kept all of our adult beverages and barware. The Green Bungalow doesn’t have a dining room, or a space that’s conducive for this type of storage, so I created my own...iPhone photo alert!


I contemplated a beverage cart, but in looking at my surroundings, I decided there wasn’t really a perfect place for it. That’s when it hit me – my mirrored HomeGoods cabinet!! (which hasn’t been filled since I bought it). I relocated a framed photograph, a candle and a vase of pinwheels I’d made (more on those later) and headed to the basement to collect some booze, mixers, wine stoppers and coasters to take up the space. I think it looks pretty great, if I do say so myself! I was also able to fit my wine glasses inside the cabinet – perfection!

But, one of my favorite parts of the bar is the “Cheers” chalkboard, inviting friends for a drink. That was super easy to make using an ornate frame I picked up at HomeGoods (where else?!) and some chalkboard paint. If you take the glass out of the frame, you can apply the chalk paint right over it. The worst part is waiting 24 hours for it to be ready. Once it was, I attempted writing “Cheers” a few times before it actually came out how I liked it. Now that it’s hung and all put together, I’m glad I didn’t splurge on a bar cart!

Working with what you’ve got is so great because it gives a fresh look to your space and even better, it’s free! Plus it’s just fun pulling together a few items you have laying around and creating something new with them.

What items have you been inspired by around your house? Anyone else have all their booze out on display? What does yours look like? I will try to take better photos with my Nikon this weekend!

6.21.2012

Happy Hour Wreath


Totally been slacking on the blog lately! I have actually completed some fun projects, but haven’t found the time to photograph them in natural light, with a good camera, and write about them. Between changing jobs, helping my husband start up his dog walking business, “Paws on the Pavement” and getting back into a workout regimen, I’ve been keeping my schedule pretty packed.

But here’s a quick look at one finished project that I put together in under 5 minutes – my “Happy Hour” wreath. Super simple and bright and colorful just in time for summer.


I picked up the grapevine wreath from Michael’s on a member special and I had a package of drink umbrellas laying around that I never used – for some odd reason I couldn’t find an occasion to use them?! Ha!

All I did was arrange them in a layout I liked, trying to alternate colors, and stuck the sticks through the vines. So simple. Hang on the front door and you’ll be the party house on the block! The only thing I would recommend, which I didn’t do myself, is securing the umbrellas in some way, either with wire or glue, etc. I noticed that the blue umbrellas keep falling out, but I also look at it as an opportunity to reuse the bare wreath in the fall.

Feel free to use my wreath as a guide for your own and share your photos below!

In 5 minutes when you’re done with your wreath, head over and check out my husband’s new blog (if you love dogs, or just want to see some completely adorable pics of Kylie!) It’s still a work in progress, but we’re getting there! www.pawsonthepavement.blogspot.com.

What fun summer projects have you been working on?

4.30.2012

Fab Freebie!

Despite my husband's complaints that I take forever quite a bit of time to finish my projects, and that I have a ton of stuff taking over his garage, I know he appreciates my crafty side. Here's the proof...


I got a text from him saying this nightstand was on the side of the road. The text was from an hour ago, so I raced home after Zumba hoping it was still sitting on the curb. To my delight it was...and best of all...it was free! Free! Can you believe it? It's Thomasville brand, in great shape, solid wood, it just needs a little sanding, paint, new pulls/knobs. I wish there had been two so we could use them in our bedroom, but one free nightstand is better than no free nightstands. Now I need to decide where I want to keep it. I am dying to paint a piece of furniture bright red, but unless I use it in my office, red doesn't go with my color scheme in our master or spare bedrooms.

Stay tuned for the update...it may take a while ;-)

I did start another project this weekend that's been on my list for a while...will give you the details soon!

Anyone have any fabulous furniture finds this weekend? Don't you just love free stuff??


~Amy

4.06.2012

What I Pinned: Pinterest March 2012

I'm a little behind on this, but these are my March faves from Pinterest...follow my boards to see more!


Coffee Table: I pretty much love everything about this room, but I pinned it especially for the coffee table. I love the industrial look with the metal frame, the casters and the farmhouse appeal of the wood. I'm trying to figure out how I can make this myself.


Natural Dyes for Easter Eggs: Perfect to try this weekend. I don't think Jon & I will be dying Easter eggs this year, but good to have for reference.


Red Bench from World Market: I'm really digging this bench, also available in a few other colors. It's pretty inexpensive as well, but I've never purchased anything from World Market before, so I'm not sure about the quality, but I think it would look super cute on our front porch.


Jalapeno Cilantro Margarita Recipe: Ohmygod this sounds delicious! A spicy jalapeno mingled with refreshing cilantro and lime - it's the perfect summer cocktail. I hope to be enjoying many of these on the patio this summer!


Luggage Shelves: I already wrote a post on these because I'm so in LOVE with them. I really really really NEED to do this in my office. If anyone has any vintage luggage they'd like to donate to the project, please let me know!! Such an amazing idea!


Stools, Table, Chevron Print: Ignore that this table has Christmas decorations on it. Now can we talk about how adorable those little stools are?! I freakin love them. And I love the chevron print in the backround that I originally thought was paint or wallpaper, but just realized it's art - genius! I love the colors, the cross between the glossy white table, the modern chevron print and the vintage stools that look like they were made from crates, and the mix of metal & wood. I want this in my house!


Buffalo Chicken Egg Rolls: Just say buffalo and chicken in the same sentence and my mouth waters. These little egg rolls look amazingly delicious and easy to make...bonus that they boast to be only 100 calories each!


White & Green Kitchen: I want to make something in this kitchen, perhaps the buffalo chicken spring rolls and a jalapeno cilantro margarita? (smile) It's just so bright and welcoming and the pop of green against the white & gray color scheme really makes the island the focal point of the room. I want an island, sigh.


50+ Wood Pallet Project Ideas: So many great ideas for transforming wood pallets into functional pieces for your home. I have been dying to do something with pallets and there are tons of options on this site.


And for dessert....


Pretzel Crusted, Reese's Peanut Butter Cup Cookie Pie: Wow! I actually made this a few weeks ago to bring to a friend's for dessert. It was incredible. Seriously rich, so you can't eat too much, but it was amazing. If you like cookies, chocolate and peanut butter, and who doesn't, then you need to try this dessert. It was really quick and easy to make too - definitely my kind of recipe.

What have you been pinning? Leave your pinterest link below so I can check out your pins and follow you too!

3.28.2012

DIY Wine Crate Baskets


Ever since my bridal shower almost two years ago, I've been dying to transform the wine crates used in the table centerpieces into something functional for the house. I considered turning them into shelving, but there isn't anywhere in the bungalow I'd like to keep them, so I decided to use them as storage baskets instead.

I headed to Home Depot to pick up some thick rope to use for the handles and waited for a warm, sunny day when I could head out and stain them. In the meantime, I sanded them down and made use of my brand new sander - so fun!

This is what the wine crates looked like before:


When the sunny day finally came, I grabbed some stain at my local hardware store. I decided on Minwax Wood Finish in Special Walnut because I wanted a dark brown stain without much red in it. Plus I liked that it was "special" walnut!


I started by staining the bottom first in case I didn't end up liking the color (I used a cheap ikea paint brush, probably not the right utensil, but it worked). Then I stained the 4 sides and finally the inside. Jon helped a little bit. He likes to jump on and help with my projects after I've started them.


I waited 5-15 mins and then wiped the sides down, just as the directions said. Admittedly I did not read the directions right away, so the stain did sit for a little longer in some spots, but I made sure to scrub it down with a rag to get any sticky excess stain off.

It was a gorgeous day when I did the staining so I left the crates in the sun to dry for a few hours. Then I grabbed Jon and had him drill the holes for the rope handles. The rope was 3/8" thick and so was the drill bit we used.


To get the measurements for the drill holes I just eyeballed it first to decide the best position. I didn't want them exactly centered from top to bottom, just a smidge higher than the middle. So we measured 3" down from the top and 4" from each side, then consulted the level just to be sure before drilling.

Putting the rope in was little snug, but it worked. I made knots on the insides of the crates so the handles would stay.

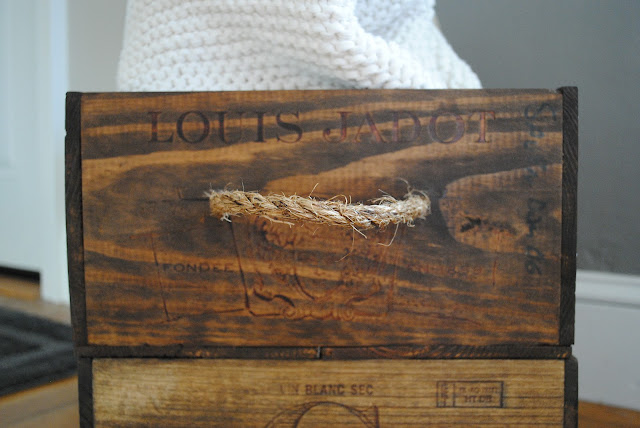
Here are some more photos of the finished crates. I LOVE how they turned out!


My attempt at being artistic in my photography...


Close up of the rope handles...


The wood was a little different between the two crates, which I think adds some interest to both pieces...


And finally, on display in our family room...


What do you think? Have you transformed your own set of wine crates? How did you do it?

~Amy

3.27.2012

MarieBelle Frangelico Truffles & Guinness

Raise your hand if you love chocolate...ok, it's hard to write a blog post with one hand! My friends came to visit The Green Bungalow over St. Patty's weekend and they brought me a delicious housewarming gift: MarieBelle Frangelico Truffles! I hadn't heard of them, but was eager to rip open the adorable red & blue box.


I am a HUGE fan of truffles. I also happen to LOVE hazelnut chocolate. So when my friend presented me with this cute little box of four truffles I was excited to try them. I have to admit though, I kinda didn't want to unwrap them; the packaging was too cute! And it didn't end there, look at this colorful pattern painted on top!


But when my friend said, "let's try them with a Guinness." I gave her a look. Guinness? Beer and chocolate? That was not my idea of a good pairing. I've heard of chocolate and wine pairings and have been to a tasting that did just this, but have never thought about pairing chocolate and beer. Then again, it was St. Patrick's Day. I'll try pretty much anything, and I never say no to alcohol, so I wasn't against giving it a shot.


It was a surprisingly yummy combination! The Frangelico Truffles have a thin crisp chocolate shell and a delicious, smooth, nutty interior. The Guinness really complimented the truffles too. Neither one overpowered the other. The taste was clean and refreshing. What I really like about these truffles too is that they aren't real heavy. Some chocolate just weighs you down...good excuse to eat more than one! ;-)

I've been slowly enjoying the extra box that was left behind. The truffles would make a fabulous gift for any occasion. They also come with a recipe for a Frangelico Truffle cocktail. I might pick up a bottle and give one a shake this weekend. You can pick up a gift box at MarieBelle in Soho, NY, or online. Don't forget to grab a box for yourself!

~Amy

3.22.2012

In Love with Luggage Shelves


Did anyone see this incredibly clever idea of using old luggage as shelving?!! It originally popped up on apartment therapy, and of course made it's way to pinterest, where I discovered it. Anyway, how freakin' cool is this? I am obsessed with the idea and am now going to be on the hunt for old luggage to recreate this in my office. Anyone have any they want to donate?

Just thought it was too cute not to share! Stay tuned for updates on my pantry stencil (I really need to finish this before J kills me!), wine crates and pinwheels!!

What have you stumbled upon recently that you can't wait to recreate yourself? Have you been taking advantage of the gorgeous weather to get some projects done?

~Amy

3.20.2012

Spring has Sprung

It's officially Spring (at least I'm hoping this gorgeous weather is here to stay). I had friends visiting from NJ this weekend and we had so much fun! We definitely took advantage of the beautiful weather all weekend with walks and al fresco dining - I even got a little color. These photos summarize the weekend:

drinks

food

hookah

I also started a project that's been on my list - adding stain and rope handles to the wine crates from my bridal shower. I began the process of sanding them down - got to finally use my new hand sander! I plan to store blankets in the crates so I need them to be nice and smooth so they don't pull the knit.


However, the weather was just too nice so my little helper and I took advantage of it by laying out in the sun, hence started, but not finished. In this pic you can also see some more projects waiting to be completed - reseeding the lawn & attempting to prettify our chain link fence!


This week is supposed to be gorgeous so I'm planning to create my own yarn ball chandeliers for the guest room! Hopefully I'll have a progress update for you soon.

And yes, much to Jon's dismay, I still have not finished the pantry stencil project. I have gotten to day three, but haven't blogged about it, so there has been slightly more progress than I've already told you of. Maybe the warm weather and longer daylight will motivate me to finally finish it off. Wish me luck!

How did you spend this gorgeous weekend? Hope you were able to take advantage!

~Amy

3.14.2012

New Beauties Have Arrived at the Green Bungalow!


Our sectional is here!!! it is so comfortable and best of all J & I no longer have to fight over couch space! There’s enough room for both of us to fully spread out without touching one another. That sounds awful for some-what-newlyweds, but sometimes you just need your personal space, especially when watching Sons of Anarchy or trying to fall asleep when football’s on ;-)

So now the mission to complete the family room is on! I’m having friends visit this weekend - which I’m SO looking forward to - so I’d like to at least get some photos and art up on the walls before they arrive. Hopefully I accomplish this!

In the meantime, I picked up this beauty at my second home, HomeGoods this weekend.


I was crushing on this version from west elm, but not loving the price tag. 


The HomeGoods ceramic side table was a fraction of west elm’s price, and I actually like it better. Of course I walked away with a few other things. Plus we finally got a grill!! With the unseasonable weather we’ve been having, we should’ve picked one up sooner. We christened it Sunday with burgers, hot dogs and grilled chicken. Bring on summer!

What did you buy or make this weekend? Anyone else fire up the grill?

~Amy

3.13.2012

3 of My Favorite Things: Travel, Food & Adventure


There’s a lot of trashy reality TV out there and although I admit I am victim to some of it, this new show from Bravo is something I don’t think any of us travelers want to miss. I, for one cannot wait! I'm psyched for Around the World in 80 Plates – think Amazing Race meets Top Chef –Bravo TV is merging food, travel, culture and adventure to keep viewers engaged and hungry for more, pun intended.

Cat Cora and Curtis Stone will host as twelve contestants travel through China, England, France, Italy, Spain and beyond, learn local customs, culture and cuisine, then face-off in various culinary challenges, competing for the grand prize of $150,000. This sounds like the perfect program for travelers with an appetite for culinary diversity and a thirst for adventure! Set your DVR’s people, the show premieres Wednesday, May 9th at 10pm.

You can learn more about Around the World in 80 Plates on the show's website.

Who will be tuning in? I know I'll be drooling, err, I mean watching!

~Amy

3.03.2012

What I Pinned: Pinterest February 2012

Here are some of my February Faves from Pinterest...follow my boards & you can see them all. Pretty sweet deal ;-)


From top; left to right:

1. Cheesy Pull Apart Bread. This bread looks so delicious and you could make it in so many different ways. What can I say, I'm a sucker for cheese & carbs!

2. Sleep Slim Smoothie. This one got a ton of repins, I haven't tried it yet, but I've been on a smoothie kick for a while and this one sounds delicious and nutritious. I'll keep you posted.

3. Pantry Stencil. This pin was my original inspiration for the crazy pantry stencil project I'm currently working on.

4. Mirrored Tablescape. How gorgeous is this mirrored table with the flowers and candles? Clearly this is for a wedding, but I pinned it as an idea for an entryway table. Not sure which direction I'm going yet.

5. Pallet Coffee Table DIY. I love the look of this coffee table constructed from pallets. I think it would be so fun & easy to make!

6. Travel Quote. I LOVE to travel and think this quote says it all.

7. Travel Memory Art. Love this idea for preserving your travel memories & displaying them on your walls. This is a great way to use up those ticket stubs, maps and other souvenirs you pick up on your travels and don't want to throw away when you return home.

8. Refinished Dresser. Pinned this for inspiration on transforming my old dresser.

9. Memory Jar. Cool idea - write down everything that makes you smile this year and save it in a jar. On NYE reflect on the happy memories from the previous year.

10. Decorate your front door for Spring. Try something different from the traditional spring wreath.

Hope you liked my February pins! If you did, follow my boards!

~Amy

What Pinterest projects did you work on this month? Anything fun I should know about. Leave a link to your boards so I can follow you! 

2.27.2012

Project Pantry: Day Two

According to my Twitter feed, a lot of people were doing the same thing as me this weekend - procrastinating and wasting time on the Internet instead of doing projects. So that's why I only spent one day on the pantry this weekend...and it happened to be Sunday night.


This is my progress after day two of stenciling. I'm hoping to finish at least this bottom section tonight. I have to tell you I almost quit. I don't know if it's my homemade stencil or what, but I'm having trouble with the stencil staying flush on the wall and everything lining up properly. The only reason I kept going is because I'm blogging about this project and didn't want to look like a failure. Jon pushed me to keep going too, saying "just keep at it, it'll look good and you'll be happy with it in the end." So that's what I did, and I hope he's right. After serious touch ups it better have been worth it!

In the meantime, let's look at this super successful project from Courtney at reckless glamour. She refinished  and added a union jack to this dresser. I just love it! The colors, the cup pulls, the union jack, the distressing that gives it an old weathered look. Fabulous job Courtney! Check out her blog for all the other amazing projects she's completed.

photo via reckless glamour

2.25.2012

Review of Lolita Cocina & Tequila Bar

I have now been to Lolita cocina and tequila bar on two occasions and will most definitely be back for more.


A few weeks ago I met up with my good friend Nicole for happy hour. We weren't sure where we wanted to go, but we both love trying new places so we decided on Lolita in Boston's Back Bay on a recommendation. Wow. It did not disappoint!


I'm a sucker for interesting cocktails, especially if St. Germain is in the mix, so I had to try the white lie margarita. Holy! I have never had a better drink in my entire life. I already loved this place and I'd been there five minutes.


We sat down and were immediately served a heaping bowl of tortilla chips, a trio of salsas and a special sauce in a square glass bottle, which ended up being a fiery habanero version. It was H-O-T.

We decided to pick at a few things and ordered tres ceviches - three types of ceviche in case you don't speak Spanish. Sangrita - lobster and scallops with tomato, orange, chili oil and avocado; traditional - mahi mahi in fresh lime juice, diced serrano chili and red onion; and coco - ahi tuna in coconut milk with fresh lime, cilantro leaves and jalapeno chili. I thought the coco would be the best, but turns out the traditional was the most enjoyable. The fish was delicious and the flavors were fresh and meshed really well together. It was so good!


We also wanted to try something unique so we ordered the chorizo tacos with fried eggs. It also had these little crispy cubed potatoes. They reminded me of breakfast burritos. The chorizo was awesome! Tender, crumbly and full of flavor. It was a really tasty dish.


We each tried two more drinks to get a well rounded sampling of cocktails. They were all good, including the mezcal mistress with the candied bacon rim!


When we were ready for the check, our waiter brought it over accompanied by a massive cotton candy sprinkled with pop rocks! (Not sure why I didn't take a pic of this!) I'd never seen anything like that before at a restaurant. It made the experience unlike any other I've had, super memorable. To top it off, the waiter left us two temporary tattoos with the restaurant logo. Needless to say, we did not apply these to our bodies, but thought it was a cool idea.


I loved the entire experience of Lolita so much that I took J & my parents back this past weekend. It was packed at 9:00 & we had to wait outside in line just to put our names in for dinner. The wait was an hour & a half to two hours for a table. I was kind of deflated because I figured everyone would want to leave, but we headed to the bar for a round of drinks. Of course I got the white lie again, mojito for J & margs for my parents. Everything was delicious. We ended up having a few more at the bar and finally sat around 10:30. J & I split the butternut squash & chorizo soup. A creamy, spicy soup with tortilla strips. It was incredible! My mom can't eat anything spicy, which is almost everything on the menu, but she was able to order shrimp with a mixed greens salad and avocado slices. She raved about the greens and their silky, lemony dressing. I tried one of her shrimp and it was phenomenal. Everything else was great as well, but those two dishes took the cake.


J & my parents loved the restaurant, I was so glad because I'd hyped it up so much over the weekend that I was worried they might be disappointed. They weren't; and you won't be either.


As for the decor, the restaurant has a sexy vibe - dim lights, dark corners, reds and blacks, ornate chandeliers, even the bathrooms are unique. The entire toilet, including inside the bowl is decorated in a black and white pattern that reminds me of the pottery found all over the flea markets in Mexico. Lolita is worth your time to check out, even if it's only for one margarita - but I dare you to stop at just one.

Lolita cocina and tequila bar is located at 27 Dartmouth Street in the Back Bay, Boston.

~Amy